Djangoでrssからデータを取得する方法
Djangoでrssからデータを取得する方法をご紹介します。
django-feedparserを用いて実装します。
目次
条件
- Python 3.7.0
- Django==2.2
- django-feedparser==0.2.1
事前準備
django-feedparserのインストール
django-feedparserをインストールします。
pip install django-feedparser
実装
models.py
今回、モデルは使用しません。
settings.py
以下の記述を追加します。
from django_feedparser.settings import *


INSTALLED_APPS = [
    ・・・
    'django_feedparser',
]

# ログイン後のリダイレクト先URL
LOGIN_REDIRECT_URL = '/'

FEED_RENDER_ENGINES = {
    'basic-xml': 'django_feedparser.renderer.FeedBasicRenderer',
    'basic-json': 'django_feedparser.renderer.FeedBasicRenderer',
}
urls.py
プロジェクトレベルのurl.py
from django.contrib import admin
from django.urls import path, include

urlpatterns = [
    path('admin/', admin.site.urls),
    path('', include('feed.urls')),  # ホームURLに設定
]
アプリレベルのurls.py
from django.urls import path
from . import views

app_name = 'feed'

urlpatterns = [
    # トップ画面
    path('', views.IndexView.as_view(), name='index'),
]
views.py
from django.views import generic


class IndexView(generic.TemplateView):

    template_name = 'feed/index.html'
template
base.html
必要に応じてbootstrapやcssを読み込みます。
(以下では省略しています。)
{% load staticfiles %}
<!DOCTYPE html>
<html lang="ja">
<head>
<meta charset="utf-8">
<meta name="viewport" content="width=device-width, initial-scale=1">
<link href="https://fonts.googleapis.com/css?family=Open+Sans" rel="stylesheet">
<link href="{% static 'css/style.css' %}" rel="stylesheet">
<script type="text/javascript">
$(function() {
var topBtn = $('#page-top');
topBtn.hide();
//スクロールが500に達したらボタン表示
$(window).scroll(function () {
if ($(this).scrollTop() > 500) {
topBtn.fadeIn();
} else {
topBtn.fadeOut();
}
});
//スクロールしてトップ
topBtn.click(function () {
$('body,html').animate({
scrollTop: 0
}, 500);
return false;
});
});
</script>
<title>{% block title %}Feed{% endblock %}</title>
</head>
<body>
<!-- ナビゲーションバーの設定 -->
<nav class="navbar navbar-expand-md navbar-dark bg-dark sticky-top">
<div class="container">
<a class="navbar-brand" href="{% url 'feed:index' %}">Feed</a>
<button class="navbar-toggler" type="button" data-toggle="collapse" data-target="#navbarResponsive" aria-controls="navbarResponsive" aria-expanded="false" aria-label="Toggle navigation">
<span class="navbar-toggler-icon"></span>
</button>
<div class="collapse navbar-collapse" id="navbarResponsive">
<ul class="navbar-nav ml-auto">
<li class="nav-item">
<a class="nav-link" href="{% url 'feed:index' %}">RSS一覧</a>
</li>
</ul>
</div>
</div>
</nav>
<main>
{% block content %}
{% endblock %}
</main>
<p id="page-top"><a href="#">PAGE TOP</a></p>
<footer class="py-4 bg-dark">
<div class="container text-center">
<p class="text-light"><small>Copyright ©2019 Feed, All Rights Reserved.</small></p>
</div>
</footer>
</body>
</html>
index.html
ポイントは以下の2行を記述することです。
- {% load feedparser_tags %}
- {% feedparser_render ‘https://headlines.yahoo.co.jp/rss/all-c_sci.xml’ %}
ここではYahooニュースのRSSを指定しています。
{% extends 'base.html' %}

{% block content %}
<div class="col-lg-8 offset-lg-2">

    <h1>RSS一覧</h1>

    {% load feedparser_tags %}
    {% feedparser_render 'https://headlines.yahoo.co.jp/rss/all-c_sci.xml' %}

</div>

{% endblock %}
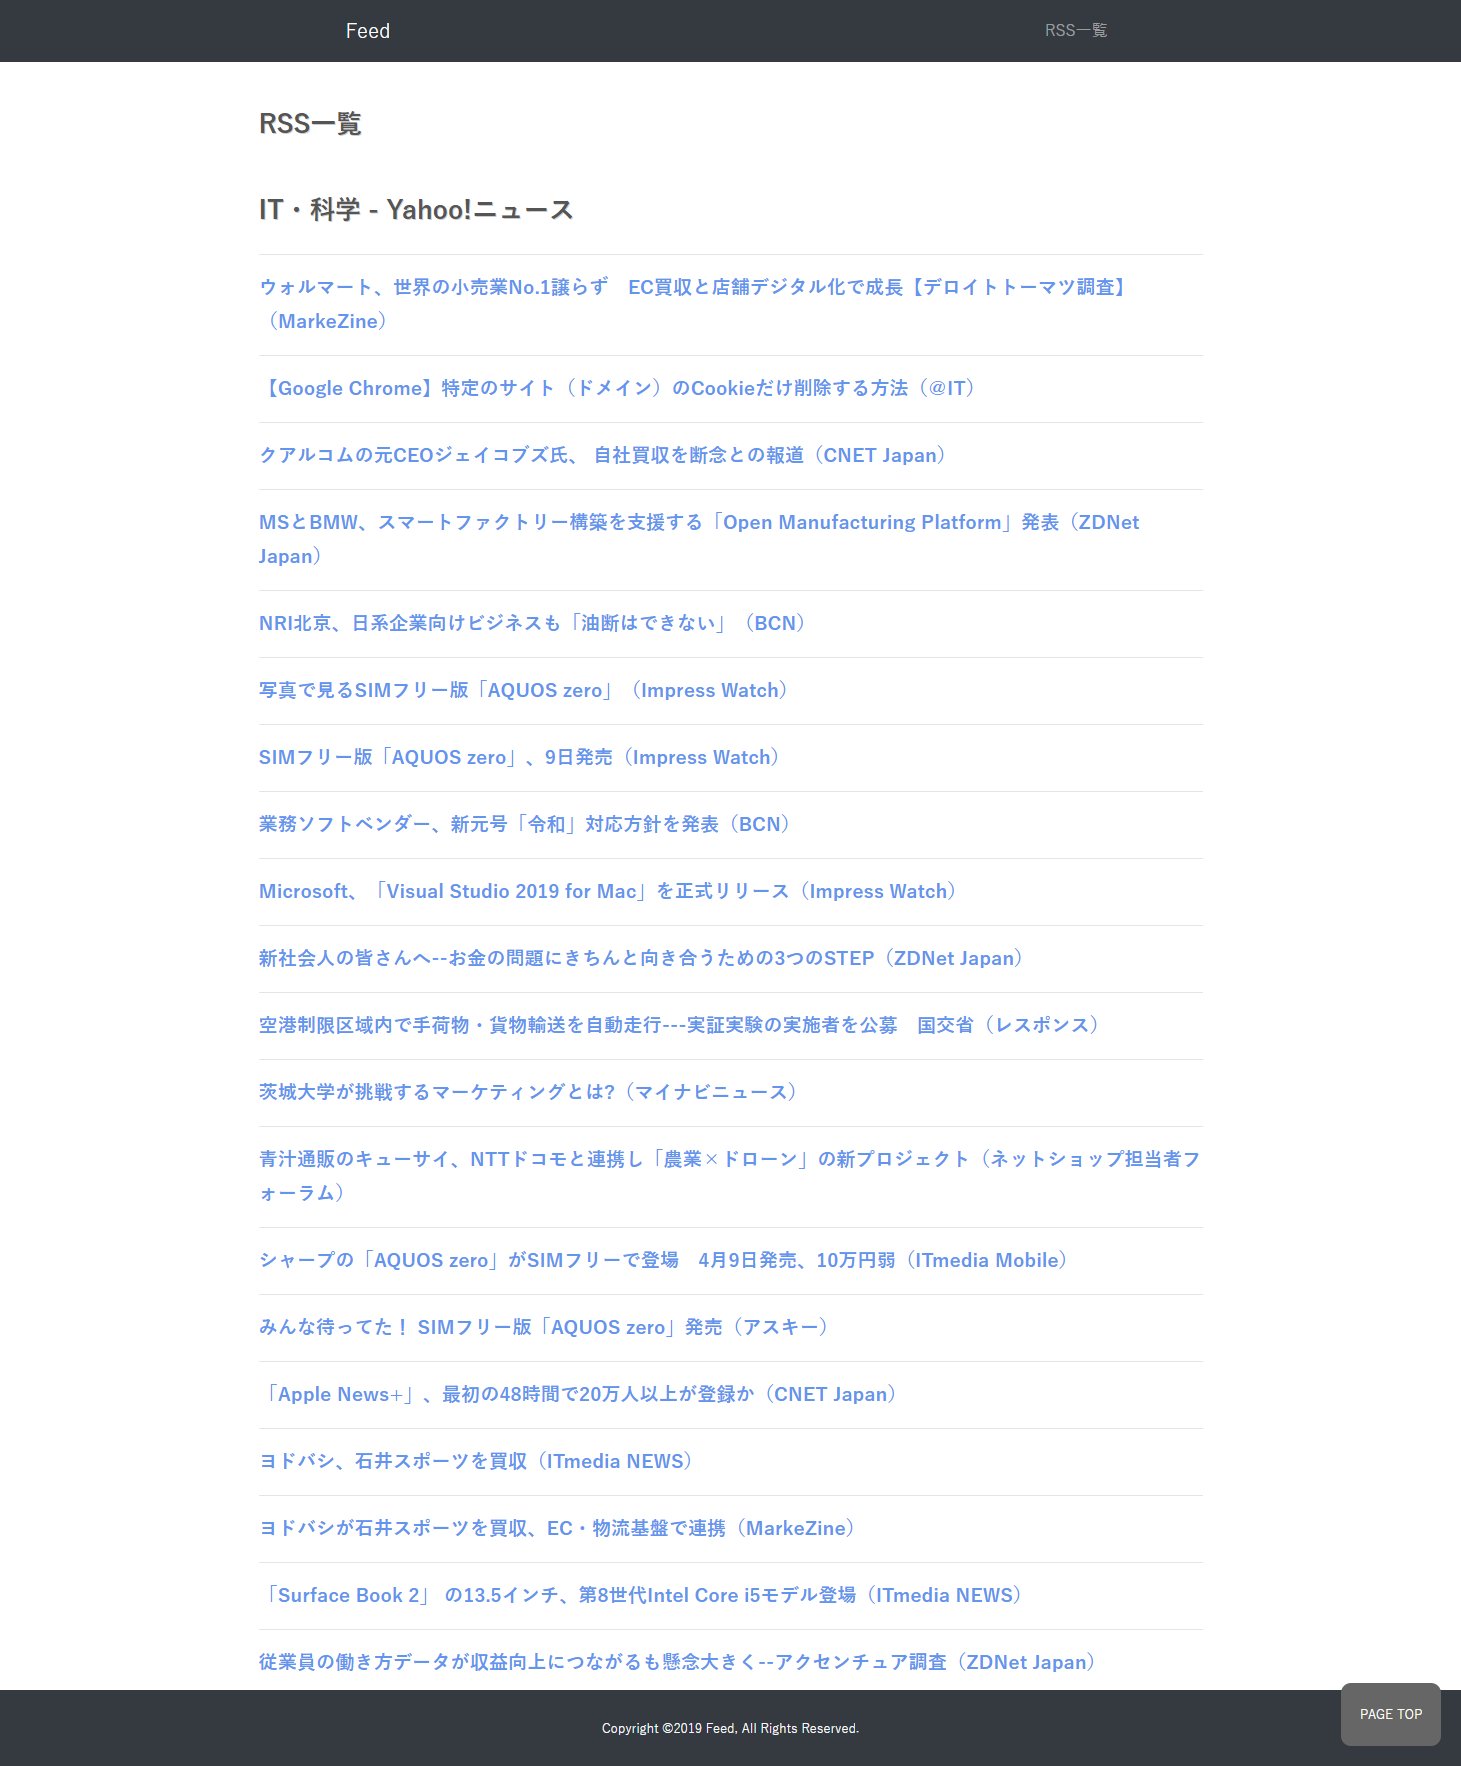
実行結果
以下のように情報が取得され、一覧表示します。
feedparserを用いた場合
「feedparser」を用いることで、より柔軟に作成することが出来ます。
feedparserのインストール
以下のコマンドを実行して「feedparser」をインストールします。
$ pip install feedparser
views.py
以下のような処理を追記します。
- feedparserをインポート
- 対象URLをパース下結果をcontextに渡す。
import logging
from django.views import generic
import feedparser

logger = logging.getLogger('development')


class IndexView(generic.TemplateView):

    template_name = 'feed/index.html'

    def get_context_data(self, **kwargs):
        context = super().get_context_data(**kwargs)

        url = 'https://headlines.yahoo.co.jp/rss/all-c_sci.xml'
        feed = feedparser.parse(url)

        context = {
            'feed_title': feed['feed']['title'],
            'entries': feed['entries'],
        }

        return context
template
index.html
views.pyでセットしたcontextから、各種情報を取り出して表示します。
{% extends 'base.html' %}

{% block content %}
<div class="col-lg-8 offset-lg-2">

    <h1>RSS一覧</h1>
    <h2>{{ feed_title }}</h2>
    {% for entry in entries %}
        <div>
          <p><a href="{{ entry.link }}" target="_blank">{{ entry.title }}</a></p>
        </div>
    {% endfor %}
</div>

{% endblock %}
実行結果
以下のように表示されます。
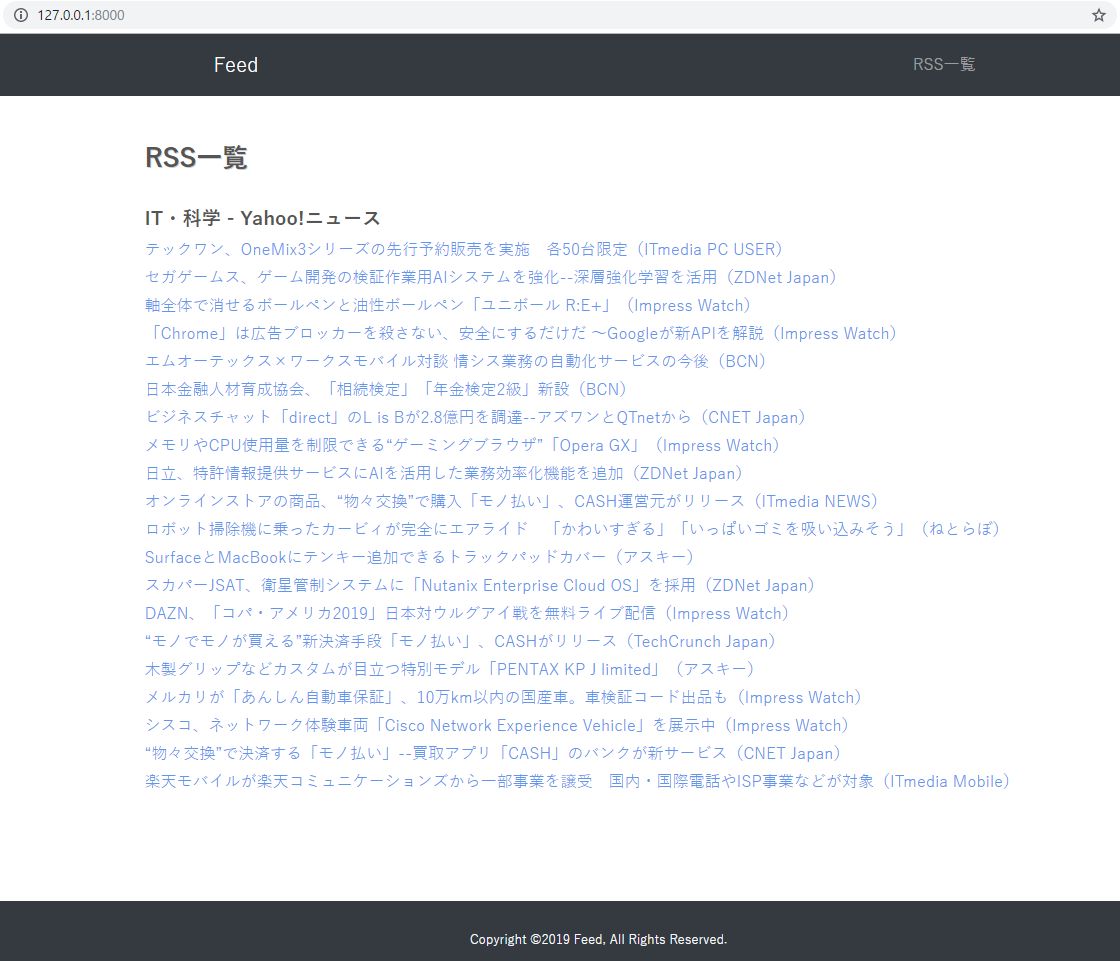
表示する項目や画面のデザイン変更などを、柔軟に行うことが出来ます。
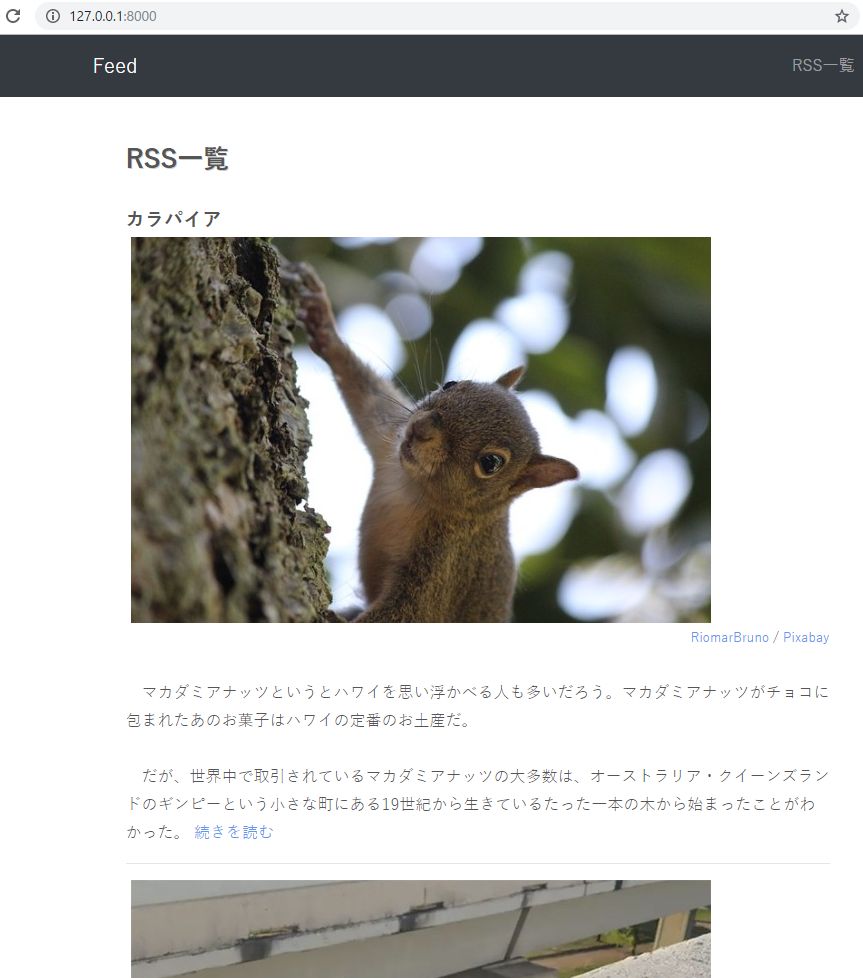
画像付きサマリーを取得する
もう少し改造して、画像付きサマリーを表示するようにしてみます。
ここではガラパイアのRDFを使用します。
構造の確認
ガラパイアのRDFをブラウザで実行すると、以下のような構造になっていることが分かります。
<!-- rdfの抜粋 --> <item rdf:about="http://karapaia.com/archives/52275397.html"> <title>知ってた?世界のマカダミアナッツの70%はオーストラリアの一本の木によってもたらされたものだった</title> <link>http://karapaia.com/archives/52275397.html</link> <description> RiomarBruno / Pixabay マカダミアナッツというとハワイを思い浮かべる人も多いだろう。マカダミアナッツがチョコに包まれたあのお菓子はハワイの定番のお土産だ。 だが、世界中で取引されているマカダミアナッツの大多数は、オーストラリア・クイーンズランドのギンピ... </description> <dc:creator>parumo_zaeega</dc:creator> <dc:date>2019-06-13T14:30:13+09:00</dc:date> <dc:subject>知る</dc:subject> <content:encoded> <![CDATA[ <img src="https://livedoor.blogimg.jp/karapaia_zaeega/imgs/d/a/da2dabf2.jpg" width="580" height="386" border="0" alt="squirrel-3009175_640_e" hspace="5" class="pict" /><br /><div align="right"><span style="font-size: small;"><a href="https://pixabay.com/ja/users/RiomarBruno-3059709/?utm_source=link-attribution&utm_medium=referral&utm_campaign=image&utm_content=3009175">RiomarBruno</a> / <a href="https://pixabay.com/ja/?utm_source=link-attribution&utm_medium=referral&utm_campaign=image&utm_content=3009175">Pixabay</a></span></div><br> マカダミアナッツというとハワイを思い浮かべる人も多いだろう。マカダミアナッツがチョコに包まれたあのお菓子はハワイの定番のお土産だ。<br> <br> だが、世界中で取引されているマカダミアナッツの大多数は、オーストラリア・クイーンズランドのギンピーという小さな町にある19世紀から生きているたった一本の木から始まったことがわかった。 <a href="http://karapaia.com/archives/52275397.html">続きを読む</a> <img src="http://counter2.blog.livedoor.com/c?ro=1&act=rss&output=no&id=2628902&name=karapaia_zaeega&pid=52275397" width="1" height="1" /> ]]> </content:encoded> </item>
「content」タグ内に、画像付きサマリーが格納されているようです。
そこで、テンプレートで「content」タグの内容を表示するようにします。
テンプレート
index.html
以下のようにして、「content」の内容を指定します。
{% autoescape off %}{% endautoescape %}で囲うことでHTMLエスケープさせずに表示するようにします。
{% extends 'base.html' %}

{% block content %}
<div class="col-lg-8 offset-lg-2">

    <h1>RSS一覧</h1>
    <h2>{{ feed_title }}</h2>
    {% for entry in entries %}
        <div>
            {% for image in entry.content %}
                {% autoescape off %} {{ image.value }} {% endautoescape %}
                <hr>
            {% endfor %}
        </div>
    {% endfor %}
</div>

{% endblock %}
実行結果
画像付きサマリーが表示されるようになります。
サンプルソース
GitHubに当該記事のサンプルソースを公開しています。
参考
GitHub:django-feedparser
https://github.com/sveetch/django-feedparser