Spring Bootでデータベース(PostgreSQL)にアクセスする方法(gradle版)
Spring Bootでデータベース(PostgreSQL)にアクセスする方法(gradle版)をご紹介します。
条件
- Spring Boot 2.5.0
- PostgreSQL 13.3
- gradle
事前準備1
データベース作成
まずは、PostgreSQLにデータベースおよびテーブルを作成します。
以下のコマンドを実行します。
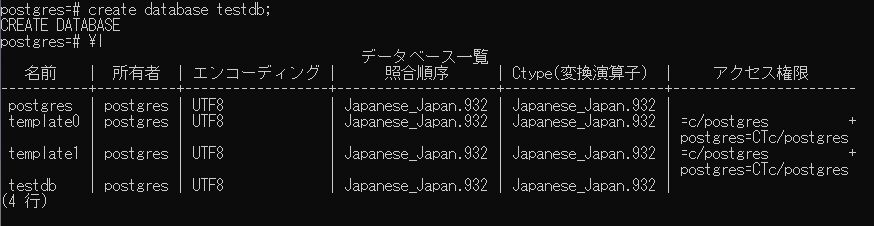
# create database testdb;
作成したデータベースへ切り替え
以下のコマンドで、作成したデータベースに切り替えます。
# \c testdb
![]()
テーブル作成
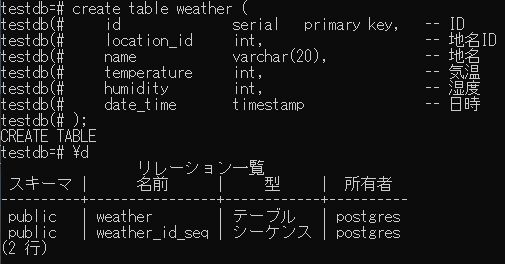
例として以下のようなテーブルを作成します。
create table weather (
    id              serial   primary key,   -- ID
    location_id     int,                    -- 地名ID
    name            varchar(20),            -- 地名
    temperature     int,                    -- 気温
    humidity        int,                    -- 湿度
    date_time       timestamp               -- 日時
);
データ追加
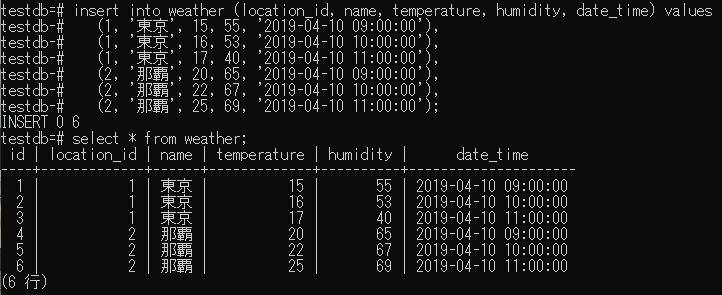
テーブルにデータを追加します。
insert into weather (location_id, name, temperature, humidity, date_time) values
   (1, '東京', 15, 55, '2019-04-10 09:00:00'),
   (1, '東京', 16, 53, '2019-04-10 10:00:00'),
   (1, '東京', 17, 40, '2019-04-10 11:00:00'),
   (2, '那覇', 20, 65, '2019-04-10 09:00:00'),
   (2, '那覇', 22, 67, '2019-04-10 10:00:00'),
   (2, '那覇', 25, 69, '2019-04-10 11:00:00');
事前準備2
Spring Bootで適当なプロジェクトを作成します。
ここでは、単純な「Hello Worldプロジェクト」を使用します。
Hello Worldプロジェクトの作成については、以下の記事をご参照ください。
DB接続
DB接続情報の設定
application.propertiesに以下のような記述を追記します。(環境に応じて適宜変更してください。)
spring.jpa.database=POSTGRESQL
spring.datasource.url=jdbc:postgresql://localhost:5432/testdb
spring.datasource.username=postgres
spring.datasource.password=postgrespassword
spring.jpa.open-in-view=True
依存関係
build.gradleに以下の記述を追記します。
- implementation ‘org.springframework.boot:spring-boot-starter-data-jpa’
- runtimeOnly ‘org.postgresql:postgresql’
build.gradleの全体は以下の通りです。
plugins {
  id 'org.springframework.boot' version '2.5.0'
  id 'io.spring.dependency-management' version '1.0.11.RELEASE'
  id 'java'
}

group = 'com.example'
version = '0.0.1-SNAPSHOT'
sourceCompatibility = '11'

repositories {
  mavenCentral()
}

dependencies {
  implementation 'org.springframework.boot:spring-boot-starter-thymeleaf'
  implementation 'org.springframework.boot:spring-boot-starter-web'
  implementation 'org.springframework.boot:spring-boot-starter-data-jpa'
  runtimeOnly 'org.postgresql:postgresql'
  testImplementation 'org.springframework.boot:spring-boot-starter-test'
}

test {
  useJUnitPlatform()
}
エンティティ作成
modelフォルダ配下に「Weather.java」を作成します。
package com.example.demo.model;

import java.sql.Timestamp;

import javax.persistence.Entity;
import javax.persistence.GeneratedValue;
import javax.persistence.GenerationType;
import javax.persistence.Id;
import javax.persistence.Table;

@Entity
@Table(name="weather")
public class Weather {
    @Id
    @GeneratedValue(strategy=GenerationType.IDENTITY)
    private Integer id;

    private Integer location_id;

    private String name;

    private Integer temperature;

    private Integer humidity;

    private Timestamp date_time;

	public Integer getId() {
		return id;
	}

	public void setId(Integer id) {
		this.id = id;
	}

	public Integer getLocation_id() {
		return location_id;
	}

	public void setLocation_id(Integer location_id) {
		this.location_id = location_id;
	}

        public String getName() {
		return name;
	}

	public void setName(String name) {
		this.name = name;
	}

	public Integer getTemperature() {
		return temperature;
	}

	public void setTemperature(Integer temperature) {
		this.temperature = temperature;
	}

	public Integer getHumidity() {
		return humidity;
	}

	public void setHumidity(Integer humidity) {
		this.humidity = humidity;
	}

	public Timestamp getDate_time() {
		return date_time;
	}

	public void setDate_time(Timestamp date_time) {
		this.date_time = date_time;
	}
}
リポジトリクラス作成
repositoryフォルダ配下に「WeatherRepository.java」を作成します。
package com.example.demo.repository;

import org.springframework.data.jpa.repository.JpaRepository;
import org.springframework.stereotype.Repository;

import com.example.demo.model.Weather;

@Repository
public interface WeatherRepository extends JpaRepository<Weather, Integer> {}
サービスクラス作成
serviceフォルダ配下に「WeatherService.java」を作成します。
package com.example.demo.service;

import java.util.List;

import org.springframework.beans.factory.annotation.Autowired;
import org.springframework.stereotype.Service;
import org.springframework.transaction.annotation.Transactional;

import com.example.demo.model.Weather;
import com.example.demo.repository.WeatherRepository;

@Service
@Transactional
public class WeatherService{

	@Autowired
	WeatherRepository weatherRepository;

	/**
	 * レコードを全件取得する。
	 * @return
	 */
	public List<Weather> findAllWeatherData(){

		return weatherRepository.findAll();
	}
}
コントローラの編集
「HelloController.java」を以下のように編集します。
package com.example.demo;

import java.util.List;

import org.springframework.beans.factory.annotation.Autowired;
import org.springframework.stereotype.Controller;
import org.springframework.ui.Model;
import org.springframework.web.bind.annotation.RequestMapping;

import com.example.demo.model.Weather;
import com.example.demo.service.WeatherService;

@Controller
public class HelloController {
	@Autowired
	WeatherService weatherService;

	@RequestMapping("/hello")
	public String hello(Model model) {

		model.addAttribute("hello", "Hello World!"); // Hello World!の表示

		// 気象データの取得
		List<Weather> weatherDataList = weatherService.findAllWeatherData();
		model.addAttribute("weatherDataList", weatherDataList);

		return "hello";
	}
}
テンプレートの編集
「hello.html」を以下のように編集します。
<!DOCTYPE html>
<html xmlns:th="http://www.thymeleaf.org">
<head>
	<meta charset="UTF-8" />
	<title></title>
</head>
<body>
<p>
	<span th:text="${hello}">Hello World!</span>
</p>

	<table>
		<tr th:each="data : ${weatherDataList}" th:object="${data}">
			<td th:text="*{id}"></td>
			<td th:text="*{location_id}"></td>
			<td th:text="*{name}"></td>
			<td th:text="*{temperature}"></td>
			<td th:text="*{humidity}"></td>
			<td th:text="*{date_time}"></td>
		</tr>
	</table>
</body>
</html>
構成
ここまでの対応でソースは以下のような構成になりました。

実行結果
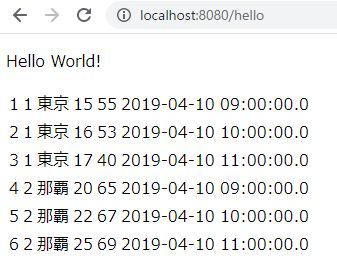
以下のようにレコード一覧が表示されます。
参考
Spring:Accessing Data with JPA
https://spring.io/guides/gs/accessing-data-jpa/
stackoverflow:How to connect PostgreSQL in Gradle Project
https://stackoverflow.com/questions/63222401/how-to-connect-postgresql-in-gradle-project