KerasでDeep Dreamを実行する方法
KerasでDeep Dreamを実行する方法をご紹介します。
目次
条件
- Python 3.7.0
- Keras 2.2.4
- tensorflow 1.14.0
- Pillow 6.1.0
- Windows 10 64bit
Deep Dreamとは?
DeepDreamは、GoogleのエンジニアであるAlexander Mordvintsevによって作成されたコンピュータビジョンプログラムです。
出典:wikipedia
事前準備
必要なライブラリをインストールします。
以下のコマンドを実行します。
Keras
pip install keras
Tensorflow
pip install tensorflow
Pillow
pip install pillow
その他
GPUで実行するとより高速になります。
GPUでKerasを実行する方法は以下の記事をご参照ください。
Windows 10でtensorflow-gpuを使う方法
Deep Deam 実行
ソース
以下のサイト(Keras Documentation)からソースをコピーし、deep_dream.pyとして保存します。
https://keras.io/examples/deep_dream/
# deep_dream.py

from __future__ import print_function

from keras.preprocessing.image import load_img, save_img, img_to_array
import numpy as np
import scipy
import argparse

from keras.applications import inception_v3
from keras import backend as K

parser = argparse.ArgumentParser(description='Deep Dreams with Keras.')
parser.add_argument('base_image_path', metavar='base', type=str,
                    help='Path to the image to transform.')
parser.add_argument('result_prefix', metavar='res_prefix', type=str,
                    help='Prefix for the saved results.')

args = parser.parse_args()
base_image_path = args.base_image_path
result_prefix = args.result_prefix

# These are the names of the layers
# for which we try to maximize activation,
# as well as their weight in the final loss
# we try to maximize.
# You can tweak these setting to obtain new visual effects.
settings = {
    'features': {
        'mixed2': 0.2,
        'mixed3': 0.5,
        'mixed4': 2.,
        'mixed5': 1.5,
    },
}


def preprocess_image(image_path):
    # Util function to open, resize and format pictures
    # into appropriate tensors.
    img = load_img(image_path)
    img = img_to_array(img)
    img = np.expand_dims(img, axis=0)
    img = inception_v3.preprocess_input(img)
    return img


def deprocess_image(x):
    # Util function to convert a tensor into a valid image.
    if K.image_data_format() == 'channels_first':
        x = x.reshape((3, x.shape[2], x.shape[3]))
        x = x.transpose((1, 2, 0))
    else:
        x = x.reshape((x.shape[1], x.shape[2], 3))
    x /= 2.
    x += 0.5
    x *= 255.
    x = np.clip(x, 0, 255).astype('uint8')
    return x

K.set_learning_phase(0)

# Build the InceptionV3 network with our placeholder.
# The model will be loaded with pre-trained ImageNet weights.
model = inception_v3.InceptionV3(weights='imagenet',
                                 include_top=False)
dream = model.input
print('Model loaded.')

# Get the symbolic outputs of each "key" layer (we gave them unique names).
layer_dict = dict([(layer.name, layer) for layer in model.layers])

# Define the loss.
loss = K.variable(0.)
for layer_name in settings['features']:
    # Add the L2 norm of the features of a layer to the loss.
    if layer_name not in layer_dict:
        raise ValueError('Layer ' + layer_name + ' not found in model.')
    coeff = settings['features'][layer_name]
    x = layer_dict[layer_name].output
    # We avoid border artifacts by only involving non-border pixels in the loss.
    scaling = K.prod(K.cast(K.shape(x), 'float32'))
    if K.image_data_format() == 'channels_first':
        loss += coeff * K.sum(K.square(x[:, :, 2: -2, 2: -2])) / scaling
    else:
        loss += coeff * K.sum(K.square(x[:, 2: -2, 2: -2, :])) / scaling

# Compute the gradients of the dream wrt the loss.
grads = K.gradients(loss, dream)[0]
# Normalize gradients.
grads /= K.maximum(K.mean(K.abs(grads)), K.epsilon())

# Set up function to retrieve the value
# of the loss and gradients given an input image.
outputs = [loss, grads]
fetch_loss_and_grads = K.function([dream], outputs)


def eval_loss_and_grads(x):
    outs = fetch_loss_and_grads([x])
    loss_value = outs[0]
    grad_values = outs[1]
    return loss_value, grad_values


def resize_img(img, size):
    img = np.copy(img)
    if K.image_data_format() == 'channels_first':
        factors = (1, 1,
                   float(size[0]) / img.shape[2],
                   float(size[1]) / img.shape[3])
    else:
        factors = (1,
                   float(size[0]) / img.shape[1],
                   float(size[1]) / img.shape[2],
                   1)
    return scipy.ndimage.zoom(img, factors, order=1)


def gradient_ascent(x, iterations, step, max_loss=None):
    for i in range(iterations):
        loss_value, grad_values = eval_loss_and_grads(x)
        if max_loss is not None and loss_value > max_loss:
            break
        print('..Loss value at', i, ':', loss_value)
        x += step * grad_values
    return x


"""Process:

- Load the original image.
- Define a number of processing scales (i.e. image shapes),
    from smallest to largest.
- Resize the original image to the smallest scale.
- For every scale, starting with the smallest (i.e. current one):
    - Run gradient ascent
    - Upscale image to the next scale
    - Reinject the detail that was lost at upscaling time
- Stop when we are back to the original size.

To obtain the detail lost during upscaling, we simply
take the original image, shrink it down, upscale it,
and compare the result to the (resized) original image.
"""


# Playing with these hyperparameters will also allow you to achieve new effects
step = 0.01  # Gradient ascent step size
num_octave = 3  # Number of scales at which to run gradient ascent
octave_scale = 1.4  # Size ratio between scales
iterations = 20  # Number of ascent steps per scale
max_loss = 10.

img = preprocess_image(base_image_path)
if K.image_data_format() == 'channels_first':
    original_shape = img.shape[2:]
else:
    original_shape = img.shape[1:3]
successive_shapes = [original_shape]
for i in range(1, num_octave):
    shape = tuple([int(dim / (octave_scale ** i)) for dim in original_shape])
    successive_shapes.append(shape)
successive_shapes = successive_shapes[::-1]
original_img = np.copy(img)
shrunk_original_img = resize_img(img, successive_shapes[0])

for shape in successive_shapes:
    print('Processing image shape', shape)
    img = resize_img(img, shape)
    img = gradient_ascent(img,
                          iterations=iterations,
                          step=step,
                          max_loss=max_loss)
    upscaled_shrunk_original_img = resize_img(shrunk_original_img, shape)
    same_size_original = resize_img(original_img, shape)
    lost_detail = same_size_original - upscaled_shrunk_original_img

    img += lost_detail
    shrunk_original_img = resize_img(original_img, shape)

save_img(result_prefix + '.png', deprocess_image(np.copy(img)))
ディレクトリ構成
以下のようなディレクトリとします。
imgの下に、元の画像を配置して、resultsの下に生成画像(dream.png)が保存されるようにします。
/
    deep_dream.py
    img/
        source.jpg
    results/
        dream.png
コマンド実行
deep_dream.pyのファイルが存在するディレクトリで、以下のコマンドを実行します。
python deep_dream.py img/source.jpg results/dream
実行結果
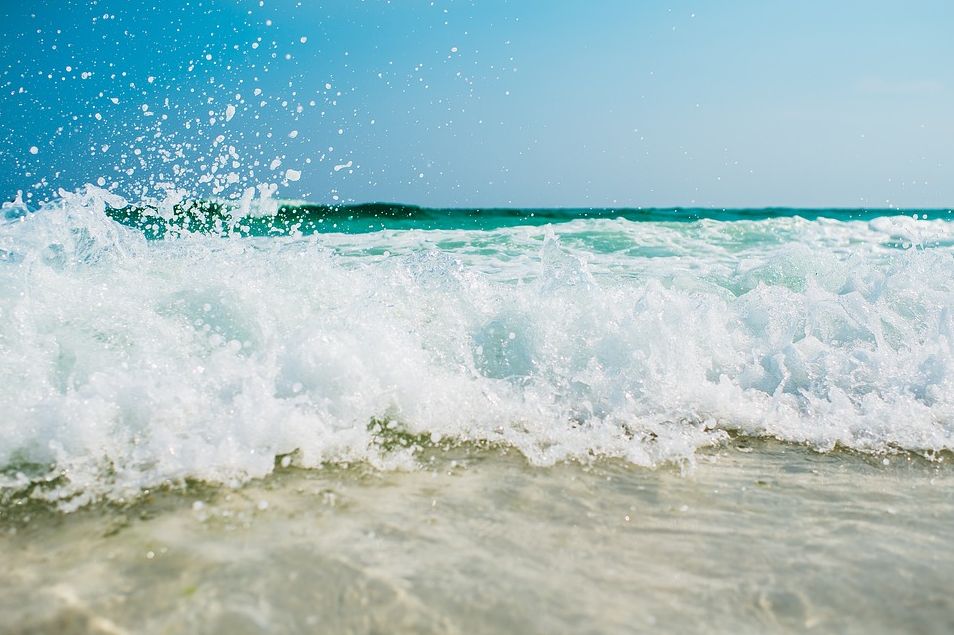
元画像
生成画像
resultsの下に生成画像(dream.png)が保存されます。

いい感じに得体の知れないクリーチャーが発生していますね。
参考
Keras Documentation:Deep dream
https://keras.io/examples/deep_dream/
Inceptionism: Going Deeper into Neural Networks
https://ai.googleblog.com/2015/06/inceptionism-going-deeper-into-neural.html
Wikipedia:DeepDream
https://en.wikipedia.org/wiki/DeepDream
