Xamarin.formsでカメラを使用する方法
Xamarin.formsでカメラを使用する方法をご紹介します。
目次
条件
- Xamarin.Forms
- Visual Studio 2019
- SHARP SH-M12(Android 9.0 – API 28)
必要なパッケージのインストール&設定
NuGetパッケージマネージャーで、共通プロジェクトに「Xam.Plugin.Media」をインストールします。

Plugin.Permissionsもインストールします。
Plugin.Permissionsの設定については、以下の記事をご参照ください。
Xamarinでデバイスの許可をアプリのダイアログで行う方法
Android
readme.txtに記載されている追加設定を行います。
MainActivity.cs
MainActivity.csにコードを追加します。
public override void OnRequestPermissionsResult(int requestCode, string[] permissions, Android.Content.PM.Permission[] grantResults)
{
    Plugin.Permissions.PermissionsImplementation.Current.OnRequestPermissionsResult(requestCode, permissions, grantResults);
}
Plugin.Permissionsの設定も併せて、以下のようになります。
using System;

using Android.App;
using Android.Content.PM;
using Android.Runtime;
using Android.OS;
using Plugin.CurrentActivity;
using Plugin.Permissions;

namespace CameraTest.Droid
{
    [Activity(Label = "CameraTest", Icon = "@mipmap/icon", Theme = "@style/MainTheme", MainLauncher = true, ConfigurationChanges = ConfigChanges.ScreenSize | ConfigChanges.Orientation)]
    public class MainActivity : global::Xamarin.Forms.Platform.Android.FormsAppCompatActivity
    {
        protected override void OnCreate(Bundle savedInstanceState)
        {
            TabLayoutResource = Resource.Layout.Tabbar;
            ToolbarResource = Resource.Layout.Toolbar;

            CrossCurrentActivity.Current.Init(this, savedInstanceState); // デバイスの許可を行うための初期化処理

            base.OnCreate(savedInstanceState);

            Xamarin.Essentials.Platform.Init(this, savedInstanceState);
            global::Xamarin.Forms.Forms.Init(this, savedInstanceState);
            LoadApplication(new App());
        }
        public override void OnRequestPermissionsResult(int requestCode, string[] permissions, [GeneratedEnum] Android.Content.PM.Permission[] grantResults)
        {
            //Xamarin.Essentials.Platform.OnRequestPermissionsResult(requestCode, permissions, grantResults);

            PermissionsImplementation.Current.OnRequestPermissionsResult(requestCode, permissions, grantResults);
            base.OnRequestPermissionsResult(requestCode, permissions, grantResults);

            Plugin.Permissions.PermissionsImplementation.Current.OnRequestPermissionsResult(requestCode, permissions, grantResults); // カメラ機能用
        }
    }
}
AndroidManifest.xml
Propertiesの下にあるAndroidManifest.xmlの<application>タグに以下を追記します。
<provider android:name="android.support.v4.content.FileProvider"
    android:authorities="${applicationId}.fileprovider"
    android:exported="false"
    android:grantUriPermissions="true">
  <meta-data android:name="android.support.FILE_PROVIDER_PATHS"
    android:resource="@xml/file_paths"></meta-data>
</provider>
全体を見ると、以下のようになります。
<?xml version="1.0" encoding="utf-8"?>
<manifest xmlns:android="http://schemas.android.com/apk/res/android" android:versionCode="1" android:versionName="1.0" package="com.companyname.cameratest">
    <uses-sdk android:minSdkVersion="21" android:targetSdkVersion="28" />
    <application android:label="CameraTest.Android">
      <provider android:name="android.support.v4.content.FileProvider"
        android:authorities="${applicationId}.fileprovider"
        android:exported="false"
        android:grantUriPermissions="true">
        <meta-data android:name="android.support.FILE_PROVIDER_PATHS"
          android:resource="@xml/file_paths"></meta-data>
      </provider>
    </application>
    <uses-permission android:name="android.permission.ACCESS_NETWORK_STATE" />
</manifest>
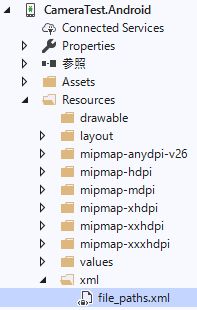
file_paths.xml
Resourcesの下に、xmlというフォルダを作成して「file_paths.xml」というファイルを追加します。
内容は以下の通りです。
<?xml version="1.0" encoding="utf-8" ?>
<paths xmlns:android="http://schemas.android.com/apk/res/android">
  <external-files-path name="my_images" path="Pictures" />
  <external-files-path name="my_movies" path="Movies" />
</paths>
iOS
readme.txtに記載されている追加設定を行います。
Info.plistに以下を追記します。
<key>NSCameraUsageDescription</key>
<string>This app needs access to the camera to take photos.</string>
<key>NSPhotoLibraryUsageDescription</key>
<string>This app needs access to photos.</string>
<key>NSMicrophoneUsageDescription</key>
<string>This app needs access to microphone.</string>
<key>NSPhotoLibraryAddUsageDescription</key>
<string>This app needs access to the photo gallery.</string>
(本記事ではiOSでの動作は未確認です。)
実装
MainPage.xaml
「写真撮影」のボタンと、「撮影画像を表示する領域」を定義します。
<?xml version="1.0" encoding="utf-8" ?>
<ContentPage xmlns="http://xamarin.com/schemas/2014/forms"
             xmlns:x="http://schemas.microsoft.com/winfx/2009/xaml"
             xmlns:d="http://xamarin.com/schemas/2014/forms/design"
             xmlns:mc="http://schemas.openxmlformats.org/markup-compatibility/2006"
             mc:Ignorable="d"
             x:Class="CameraTest.MainPage">

    <StackLayout>
        <Button x:Name="pictureButton" Text="写真撮影" Clicked="pictureButton_Clicked" />
        <Image x:Name="image" HorizontalOptions = "FillAndExpand" VerticalOptions = "FillAndExpand" />
    </StackLayout>

</ContentPage>
MainPage.xaml.cs
写真撮影ボタンが押された時の処理を実装します。
Plugin.Permissionsをインストール済みのため、特にプログラムで記述しなくても、カメラ初回起動時に許可ダイアログが表示されます。
using Plugin.Media;
using System;
using System.ComponentModel;
using Xamarin.Forms;

namespace CameraTest
{
    // Learn more about making custom code visible in the Xamarin.Forms previewer
    // by visiting https://aka.ms/xamarinforms-previewer
    [DesignTimeVisible(false)]
    public partial class MainPage : ContentPage
    {
        public MainPage()
        {
            InitializeComponent();
        }

        /**
         * 写真撮影ボタンが押された時の処理
         * */
        private async void pictureButton_Clicked(object sender, System.EventArgs e)
        {
            // 初期化処理
            await CrossMedia.Current.Initialize();

            // カメラが使用可能、かつ写真が撮影可能かを判定する。
            if (!Plugin.Media.CrossMedia.Current.IsCameraAvailable || !Plugin.Media.CrossMedia.Current.IsTakePhotoSupported)
            {
                return; // 不可
            }

            // メディアオプション(保存先ディレクトリ、画像ファイル名を設定)
            var mediaOptions = new Plugin.Media.Abstractions.StoreCameraMediaOptions
            {
                Directory = "PictureTest", // 保存先ディレクトリ
                Name = $"{DateTime.UtcNow}.jpg" // 保存ファイル名
            };

            // 写真撮影
            var file = await CrossMedia.Current.TakePhotoAsync(mediaOptions);

            // キャンセルが押された場合
            if (file == null)
                return;

            // await DisplayAlert("画像ファイルの保存先", file.Path, "OK");

            // Image領域に撮影した画像を表示する。
            image.Source = ImageSource.FromStream(() =>
            {
                var stream = file.GetStream();
                return stream;
            });
        }
    }
}
実行結果
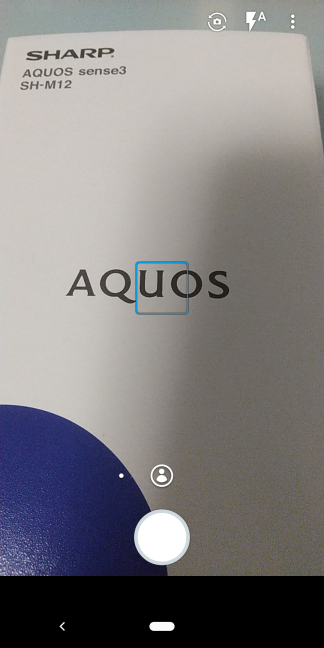
撮影前

カメラ起動
写真撮影ボタンを押すと、カメラが起動します。
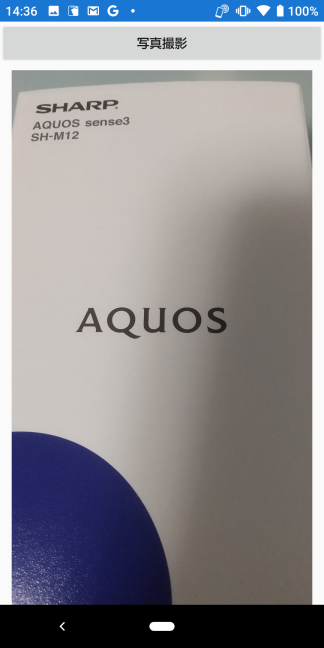
撮影後
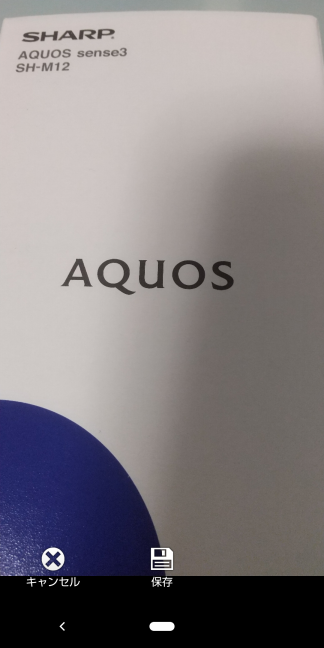
保存を選択すると、アプリ画面のイメージ表示領域に撮影画像が表示されます。
画像保存先
写真は以下のパスに保存されます。
PC\SH-M12\内部共有ストレージ\Android\data\com.companyname.cameratest\files\Pictures\PictureTest
![]()
よくあるエラー
readme.txtに記載されている、各種初期設定を行わないと、カメラ起動時に以下のようなエラーが出力されます。
**System.ArgumentException:** 'Unable to get file location. This most likely means that the file provider information is not set in your Android Manifest file. Please check documentation on how to set this up in your project.'
参考
GitHub:MediaPlugin
https://github.com/jamesmontemagno/MediaPlugin