Spring Data REST API(PostgreSQL)を作成する方法

Spring Data REST API(PostgreSQL)を作成する方法をご紹介します。

条件

  • Spring Tool Suite 4
  • Spring Boot 2.5.0
  • PostgreSQL 13.3
  • gradle

事前準備

データベース作成

まずは、PostgreSQLにデータベースおよびテーブルを作成します。

以下のコマンドを実行します。

Plain text
Copy to clipboard
Open code in new window
EnlighterJS 3 Syntax Highlighter
# create database testdb;

作成したデータベースへ切り替え

以下のコマンドで、作成したデータベースに切り替えます。

Plain text
Copy to clipboard
Open code in new window
EnlighterJS 3 Syntax Highlighter
# \c testdb
# \c testdb
# \c testdb

テーブル作成

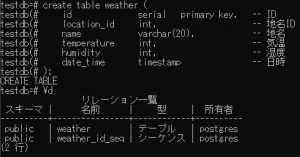
例として以下のようなテーブルを作成します。

Plain text
Copy to clipboard
Open code in new window
EnlighterJS 3 Syntax Highlighter
create table weather (
id serial primary key, -- ID
location_id int, -- 地名ID
name varchar(20), -- 地名
temperature int, -- 気温
humidity int, -- 湿度
date_time timestamp -- 日時
);
create table weather ( id serial primary key, -- ID location_id int, -- 地名ID name varchar(20), -- 地名 temperature int, -- 気温 humidity int, -- 湿度 date_time timestamp -- 日時 );
create table weather (
    id              serial   primary key,   -- ID
    location_id     int,                    -- 地名ID
    name            varchar(20),            -- 地名
    temperature     int,                    -- 気温
    humidity        int,                    -- 湿度
    date_time       timestamp               -- 日時
);

データ追加

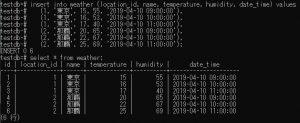
テーブルにデータを追加します。

Plain text
Copy to clipboard
Open code in new window
EnlighterJS 3 Syntax Highlighter
insert into weather (location_id, name, temperature, humidity, date_time) values
(1, '東京', 15, 55, '2019-04-10 09:00:00'),
(1, '東京', 16, 53, '2019-04-10 10:00:00'),
(1, '東京', 17, 40, '2019-04-10 11:00:00'),
(2, '那覇', 20, 65, '2019-04-10 09:00:00'),
(2, '那覇', 22, 67, '2019-04-10 10:00:00'),
(2, '那覇', 25, 69, '2019-04-10 11:00:00');
insert into weather (location_id, name, temperature, humidity, date_time) values (1, '東京', 15, 55, '2019-04-10 09:00:00'), (1, '東京', 16, 53, '2019-04-10 10:00:00'), (1, '東京', 17, 40, '2019-04-10 11:00:00'), (2, '那覇', 20, 65, '2019-04-10 09:00:00'), (2, '那覇', 22, 67, '2019-04-10 10:00:00'), (2, '那覇', 25, 69, '2019-04-10 11:00:00');
insert into weather (location_id, name, temperature, humidity, date_time) values 
   (1, '東京', 15, 55, '2019-04-10 09:00:00'),
   (1, '東京', 16, 53, '2019-04-10 10:00:00'),
   (1, '東京', 17, 40, '2019-04-10 11:00:00'),
   (2, '那覇', 20, 65, '2019-04-10 09:00:00'),
   (2, '那覇', 22, 67, '2019-04-10 10:00:00'),
   (2, '那覇', 25, 69, '2019-04-10 11:00:00');

プロジェクトの作成

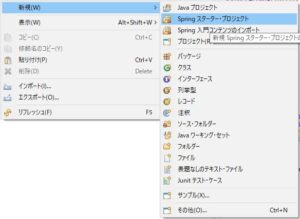
STSのパッケージエクスプローラーで、右クリック > 新規 > Spring スターター・プロジェクトを選択します。

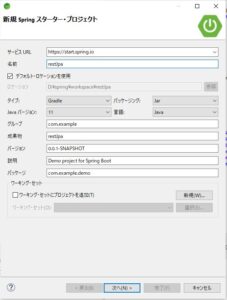
名前に適当な値(ここではrestJpa)を入力し、次へボタンを押します。

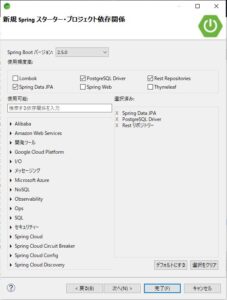
プロジェクトの依存関係で、以下を選択して完了ボタンを押します。

  • Spring Data JPA
  • PostgreSQL Driver
  • Rest Repositories

ソース/設定ファイル等

設定ファイルの記述

application.properties

以下の内容を記述します。
(自分の環境に合わせて適宜修正してください)

Plain text
Copy to clipboard
Open code in new window
EnlighterJS 3 Syntax Highlighter
spring.jpa.database=POSTGRESQL
spring.datasource.url=jdbc:postgresql://localhost:5432/testdb
spring.datasource.username=postgres
spring.datasource.password=password
spring.jpa.open-in-view=True
spring.jpa.database=POSTGRESQL spring.datasource.url=jdbc:postgresql://localhost:5432/testdb spring.datasource.username=postgres spring.datasource.password=password spring.jpa.open-in-view=True
spring.jpa.database=POSTGRESQL
spring.datasource.url=jdbc:postgresql://localhost:5432/testdb
spring.datasource.username=postgres
spring.datasource.password=password
spring.jpa.open-in-view=True

ソースの追加

Weather.java

DBに定義した内容を記述します。

Plain text
Copy to clipboard
Open code in new window
EnlighterJS 3 Syntax Highlighter
package com.example.demo.entity;
import java.sql.Timestamp;
import javax.persistence.Entity;
import javax.persistence.GeneratedValue;
import javax.persistence.GenerationType;
import javax.persistence.Id;
@Entity
public class Weather {
@Id
@GeneratedValue(strategy=GenerationType.IDENTITY)
private Integer id;
private Integer location_id;
private String name;
private Integer temperature;
private Integer humidity;
private Timestamp date_time;
public Integer getId() {
return id;
}
public void setId(Integer id) {
this.id = id;
}
public Integer getLocation_id() {
return location_id;
}
public void setLocation_id(Integer location_id) {
this.location_id = location_id;
}
public String getName() {
return name;
}
public void setName(String name) {
this.name = name;
}
public Integer getTemperature() {
return temperature;
}
public void setTemperature(Integer temperature) {
this.temperature = temperature;
}
public Integer getHumidity() {
return humidity;
}
public void setHumidity(Integer humidity) {
this.humidity = humidity;
}
public Timestamp getDate_time() {
return date_time;
}
public void setDate_time(Timestamp date_time) {
this.date_time = date_time;
}
}
package com.example.demo.entity; import java.sql.Timestamp; import javax.persistence.Entity; import javax.persistence.GeneratedValue; import javax.persistence.GenerationType; import javax.persistence.Id; @Entity public class Weather { @Id @GeneratedValue(strategy=GenerationType.IDENTITY) private Integer id; private Integer location_id; private String name; private Integer temperature; private Integer humidity; private Timestamp date_time; public Integer getId() { return id; } public void setId(Integer id) { this.id = id; } public Integer getLocation_id() { return location_id; } public void setLocation_id(Integer location_id) { this.location_id = location_id; } public String getName() { return name; } public void setName(String name) { this.name = name; } public Integer getTemperature() { return temperature; } public void setTemperature(Integer temperature) { this.temperature = temperature; } public Integer getHumidity() { return humidity; } public void setHumidity(Integer humidity) { this.humidity = humidity; } public Timestamp getDate_time() { return date_time; } public void setDate_time(Timestamp date_time) { this.date_time = date_time; } }
package com.example.demo.entity;

import java.sql.Timestamp;

import javax.persistence.Entity;
import javax.persistence.GeneratedValue;
import javax.persistence.GenerationType;
import javax.persistence.Id;


@Entity
public class Weather {
  @Id
    @GeneratedValue(strategy=GenerationType.IDENTITY)
    private Integer id;
    
    private Integer location_id;
    
    private String name;
    
    private Integer temperature;
    
    private Integer humidity;
    
    private Timestamp date_time;

  public Integer getId() {
    return id;
  }

  public void setId(Integer id) {
    this.id = id;
  }

  public Integer getLocation_id() {
    return location_id;
  }

  public void setLocation_id(Integer location_id) {
    this.location_id = location_id;
  }

  public String getName() {
    return name;
  }

  public void setName(String name) {
    this.name = name;
  }

  public Integer getTemperature() {
    return temperature;
  }

  public void setTemperature(Integer temperature) {
    this.temperature = temperature;
  }

  public Integer getHumidity() {
    return humidity;
  }

  public void setHumidity(Integer humidity) {
    this.humidity = humidity;
  }

  public Timestamp getDate_time() {
    return date_time;
  }

  public void setDate_time(Timestamp date_time) {
    this.date_time = date_time;
  }
}

WeatherRepository.java

インターフェースのみを定義します。

Plain text
Copy to clipboard
Open code in new window
EnlighterJS 3 Syntax Highlighter
package com.example.demo.repository;
import org.springframework.data.rest.core.annotation.RepositoryRestResource;
import org.springframework.data.repository.PagingAndSortingRepository;
import com.example.demo.entity.Weather;
@RepositoryRestResource(collectionResourceRel = "weathers", path = "weathers")
public interface WeatherRepository extends PagingAndSortingRepository<Weather, Integer>{
}
package com.example.demo.repository; import org.springframework.data.rest.core.annotation.RepositoryRestResource; import org.springframework.data.repository.PagingAndSortingRepository; import com.example.demo.entity.Weather; @RepositoryRestResource(collectionResourceRel = "weathers", path = "weathers") public interface WeatherRepository extends PagingAndSortingRepository<Weather, Integer>{ }
package com.example.demo.repository;

import org.springframework.data.rest.core.annotation.RepositoryRestResource;
import org.springframework.data.repository.PagingAndSortingRepository;

import com.example.demo.entity.Weather;

@RepositoryRestResource(collectionResourceRel = "weathers", path = "weathers")
public interface WeatherRepository extends PagingAndSortingRepository<Weather, Integer>{

}

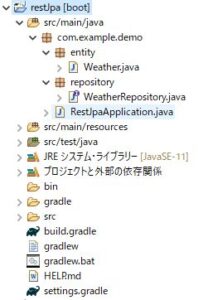
パッケージ構成

今回は以下のようなパッケージ構成としました。

実行

プロジェクトを右クリック > 実行 > Spring Bootアプリケーション を選択して実行します。

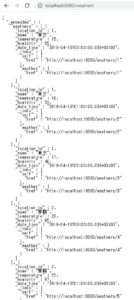
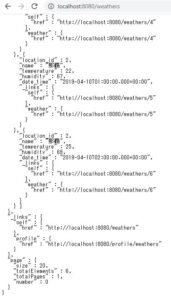
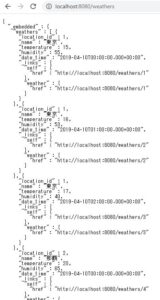
データ一覧の取得

以下のURLにブラウザでアクセスします。

Plain text
Copy to clipboard
Open code in new window
EnlighterJS 3 Syntax Highlighter
http://localhost:8080/weathers

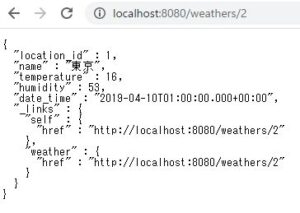
データ1件の取得

以下のようにIDを指定したURLにブラウザでします。

Plain text
Copy to clipboard
Open code in new window
EnlighterJS 3 Syntax Highlighter
http://localhost:8080/weathers/2

データの追加

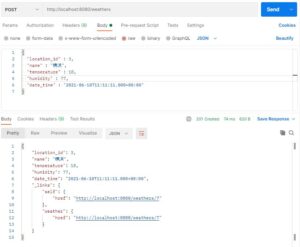
Postmanを使用してPOSTします。

URLは以下の値を設定します。

Plain text
Copy to clipboard
Open code in new window
EnlighterJS 3 Syntax Highlighter
http://localhost:8080/weathers

Headersに以下を設定します。

  • KEY: Content-Type
  • VALUE: application/json

BODYに以下を設定します。
ラジオボタンでrawを選択し、プルダウンでJSONが選択されていることを確認してください。

Plain text
Copy to clipboard
Open code in new window
EnlighterJS 3 Syntax Highlighter
{
"location_id" : 3,
"name" : "横浜",
"temperature" : 18,
"humidity" : 77,
"date_time" : "2021-06-10T11:11:11.000+00:00"
}
{ "location_id" : 3, "name" : "横浜", "temperature" : 18, "humidity" : 77, "date_time" : "2021-06-10T11:11:11.000+00:00" }
{
  "location_id" : 3,
  "name" : "横浜",
  "temperature" : 18,
  "humidity" : 77,
  "date_time" : "2021-06-10T11:11:11.000+00:00"
}

Sendボタンを押すと、POSTが実行されます。
成功すると「201 Created」となり以下のような表示となります。

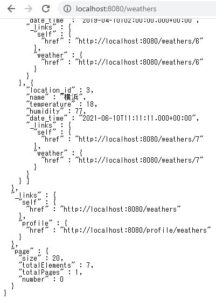
ブラウザでデータ一覧を確認すると、新しくデータが追加されていることがわかります。

データの更新

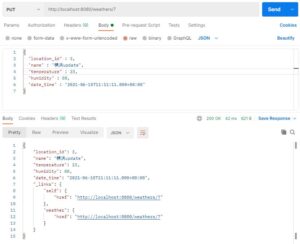
Postmanを使用してPUTします。

IDは「7」としてレコードが作成されたので、URLは以下の値とします。

Plain text
Copy to clipboard
Open code in new window
EnlighterJS 3 Syntax Highlighter
http://localhost:8080/weathers/7

HeadersはPOSTの時と同じです。

BODYに以下を設定します。

Plain text
Copy to clipboard
Open code in new window
EnlighterJS 3 Syntax Highlighter
{
"location_id" : 3,
"name" : "横浜update",
"temperature" : 23,
"humidity" : 88,
"date_time" : "2021-06-15T11:11:11.000+00:00"
}
{ "location_id" : 3, "name" : "横浜update", "temperature" : 23, "humidity" : 88, "date_time" : "2021-06-15T11:11:11.000+00:00" }
{
  "location_id" : 3,
  "name" : "横浜update",
  "temperature" : 23,
  "humidity" : 88,
  "date_time" : "2021-06-15T11:11:11.000+00:00"
}

Sendボタンを押すと、PUTが実行されます。
成功すると「200 OK」となり以下のような表示となります。

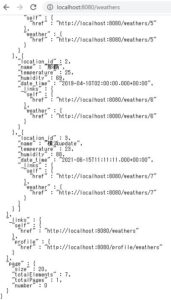
ブラウザでデータ一覧を確認すると、対象データが更新されていることがわかります。

データの削除

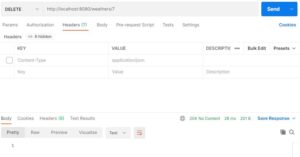
Postmanを使用してDELETEします。

IDは「7」のレコードが対象なので、URLは以下の値とします。

Plain text
Copy to clipboard
Open code in new window
EnlighterJS 3 Syntax Highlighter
http://localhost:8080/weathers/7

HeadersやBodyに設定は不要です。

Sendボタンを押すと、DELETEが実行されます。
成功すると「204 No Content」となり以下のような表示となります。

ブラウザでデータ一覧を確認すると、対象データが削除されていることがわかります。

以上で、Rest APIを用いたCRUDが出来ることを確認することが出来ました。

Lombokの導入

Lombokを用いて、ソースをすっきりさせたいと思います。

Lombokとは?

アノテーションを付加することで、getter/setter、toString、コンストラクタなどを自動生成してくれるライブラリです。

依存関係の追加

build.gradleのdependenciesに以下を追記します。

  • compileOnly ‘org.projectlombok:lombok’
  • annotationProcessor ‘org.projectlombok:lombok’

build.gradle

以下のようになりました。

Plain text
Copy to clipboard
Open code in new window
EnlighterJS 3 Syntax Highlighter
plugins {
id 'org.springframework.boot' version '2.5.0'
id 'io.spring.dependency-management' version '1.0.11.RELEASE'
id 'java'
}
group = 'com.example'
version = '0.0.1-SNAPSHOT'
sourceCompatibility = '11'
repositories {
mavenCentral()
}
dependencies {
implementation 'org.springframework.boot:spring-boot-starter-data-jpa'
implementation 'org.springframework.boot:spring-boot-starter-data-rest'
runtimeOnly 'org.postgresql:postgresql'
testImplementation 'org.springframework.boot:spring-boot-starter-test'
compileOnly 'org.projectlombok:lombok'
annotationProcessor 'org.projectlombok:lombok'
}
test {
useJUnitPlatform()
}
plugins { id 'org.springframework.boot' version '2.5.0' id 'io.spring.dependency-management' version '1.0.11.RELEASE' id 'java' } group = 'com.example' version = '0.0.1-SNAPSHOT' sourceCompatibility = '11' repositories { mavenCentral() } dependencies { implementation 'org.springframework.boot:spring-boot-starter-data-jpa' implementation 'org.springframework.boot:spring-boot-starter-data-rest' runtimeOnly 'org.postgresql:postgresql' testImplementation 'org.springframework.boot:spring-boot-starter-test' compileOnly 'org.projectlombok:lombok' annotationProcessor 'org.projectlombok:lombok' } test { useJUnitPlatform() }
plugins {
  id 'org.springframework.boot' version '2.5.0'
  id 'io.spring.dependency-management' version '1.0.11.RELEASE'
  id 'java'
}

group = 'com.example'
version = '0.0.1-SNAPSHOT'
sourceCompatibility = '11'

repositories {
  mavenCentral()
}

dependencies {
  implementation 'org.springframework.boot:spring-boot-starter-data-jpa'
  implementation 'org.springframework.boot:spring-boot-starter-data-rest'
  runtimeOnly 'org.postgresql:postgresql'
  testImplementation 'org.springframework.boot:spring-boot-starter-test'
  compileOnly 'org.projectlombok:lombok'
  annotationProcessor 'org.projectlombok:lombok'
}

test {
  useJUnitPlatform()
}

依存関係の更新

build.gradleを右クリック > Gradle > Gradleプロジェクトのリフレッシュを選択すると、依存関係が更新されます。

LombokのIDE連携

Lombokのjarダウンロード

以下のサイトからjarをダウンロードします。

https://projectlombok.org/download

Lombokのインストール

ダウンロードしたjarをコマンドプロンプトにおいて、以下のコマンドで実行します。

Plain text
Copy to clipboard
Open code in new window
EnlighterJS 3 Syntax Highlighter
java -jar lombok.jar

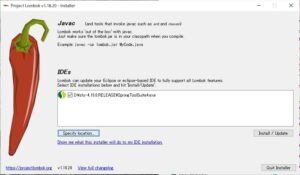
するとインストーラが起動します。

インストール対象のSTSが選択されていることを確認し、Install/Updateボタンを押します。

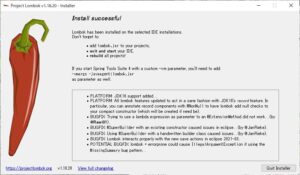
Install successfulという表示になったら、Quit Installerボタンを押して終了します。

インストールの確認

jar

SprintToolSuite4.exeのフォルダ内に以下のjarが追加されています。

  • lombok.jar

iniファイル

SprintToolSuite4.iniに以下のような記述が追加されています。

  • -javaagent:D:\sts-4.10.0.RELEASE\lombok.jar

動作確認

STSを再起動します。

ソース変更

Weather.java

  • @Dataアノテーションを追加します。
  • 作成済みのgetter/setterを削除します。
Plain text
Copy to clipboard
Open code in new window
EnlighterJS 3 Syntax Highlighter
package com.example.demo.entity;
import java.sql.Timestamp;
import javax.persistence.Entity;
import javax.persistence.GeneratedValue;
import javax.persistence.GenerationType;
import javax.persistence.Id;
import lombok.Data;
@Data
@Entity
public class Weather {
@Id
@GeneratedValue(strategy=GenerationType.IDENTITY)
private Integer id;
private Integer location_id;
private String name;
private Integer temperature;
private Integer humidity;
private Timestamp date_time;
}
package com.example.demo.entity; import java.sql.Timestamp; import javax.persistence.Entity; import javax.persistence.GeneratedValue; import javax.persistence.GenerationType; import javax.persistence.Id; import lombok.Data; @Data @Entity public class Weather { @Id @GeneratedValue(strategy=GenerationType.IDENTITY) private Integer id; private Integer location_id; private String name; private Integer temperature; private Integer humidity; private Timestamp date_time; }
package com.example.demo.entity;

import java.sql.Timestamp;

import javax.persistence.Entity;
import javax.persistence.GeneratedValue;
import javax.persistence.GenerationType;
import javax.persistence.Id;

import lombok.Data;

@Data
@Entity
public class Weather {
  @Id
    @GeneratedValue(strategy=GenerationType.IDENTITY)
    private Integer id;
    
    private Integer location_id;
    
    private String name;
    
    private Integer temperature;
    
    private Integer humidity;
    
    private Timestamp date_time;
}

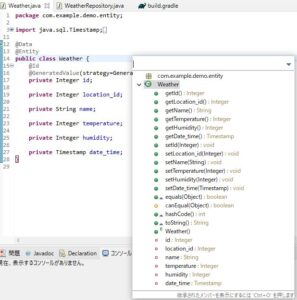
Ctrol + Oを押して、アウトラインを表示します。

以下が自動で生成されていることがわかります。

  • getter/setterメソッド
  • equals/ hashCodeメソッド
  • toStringメソッド
  • デフォルトコンストラクタ

Rest APIとしての動作も問題ありません。

参考

Sprint:Spring Data REST API の自動生成 (JPA)

https://spring.pleiades.io/guides/gs/accessing-data-rest/

Qiita:Spring JPA Data with REST と Lombokで恐ろしく簡単にREST APIを作成する。

https://qiita.com/ukiuni@github/items/fb46680146c4cc8b5187

ボイラープレートコードの排除(Lombok)

https://terasolunaorg.github.io/guideline/5.1.0.RELEASE/ja/Appendix/Lombok.html

Qiita:Lombokメモ

https://qiita.com/kuro227/items/3f017bc01a478d9cd139

Spring Data REST API(PostgreSQL)を作成する方法” に対して1件のコメントがあります。

コメントを残す

メールアドレスが公開されることはありません。 が付いている欄は必須項目です