バックエンド(SpringBoot)とフロントエンド(Nuxt.js)をローカルPC上で連携する方法:セッションによるデータ渡し編
バックエンド(SpringBoot)とフロントエンド(Nuxt.js)をローカルPC上で連携する方法(セッションによるデータ渡し)についてご紹介します。
バックエンド(SpringBoot)をSpring Tool Suiteで動かし、Nuxt.jsをVisual Studio Codeで動かすものとします。
目次
条件
- Spring Boot(Spring Tool Suiteで動作)
- maven
- thymeleaf
- Nuxt.js(Visual Studio Codeで動作)
- JavaScript
- Yarn
バックエンドモジュールの作成
Spring Tool Suiteで適当なSpring Bootプロジェクトを作成します。
ここでは以下のようなプロジェクト構成としました。
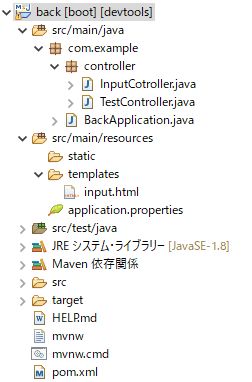
ソース等
TestController.java
以下のURLにアクセスすると、セッションから取り出したデータを表示するだけの単純なコントローラを作成します。
http://localhost:8080/
package com.example.controller;

import javax.servlet.http.HttpServletRequest;
import javax.servlet.http.HttpSession;
import org.springframework.web.bind.annotation.GetMapping;
import org.springframework.web.bind.annotation.RestController;

@RestController
public class TestController {

    @GetMapping(value = "/")
    public String getTest(HttpServletRequest request) {

        HttpSession session = request.getSession();

        // セッションからデータを取得。
        String strData = (String) session.getAttribute(session.getId());

        return strData;
    }
}
InputController.java
以下のURLにアクセスすると、入力フォームを表示します。
http://localhost:8080/input
入力フォームから値が送信されたら、/recieveで受信し受け取ったデータをセッションに保存します。
その後、フロント画面へリダイレクトします。
package com.example.controller;

import javax.servlet.http.HttpServletRequest;
import javax.servlet.http.HttpSession;
import org.springframework.stereotype.Controller;
import org.springframework.web.bind.annotation.GetMapping;
import org.springframework.web.bind.annotation.PostMapping;
import org.springframework.web.bind.annotation.RequestParam;

@Controller
public class InputCotroller {

    @GetMapping("/input")
    public String home() {
        return "input";
    }

    @PostMapping("/recieve")
    public String result(@RequestParam String message, HttpServletRequest request) {

        // セッションの取得
        HttpSession session = request.getSession();

        // セッションに情報を保持
        session.setAttribute(session.getId(), message);

        // フロントへリダイレクト
        return "redirect:http://localhost:3000/";
    }
}
pom.xml
<?xml version="1.0" encoding="UTF-8"?>
<project xmlns="http://maven.apache.org/POM/4.0.0" xmlns:xsi="http://www.w3.org/2001/XMLSchema-instance"
  xsi:schemaLocation="http://maven.apache.org/POM/4.0.0 https://maven.apache.org/xsd/maven-4.0.0.xsd">
  <modelVersion>4.0.0</modelVersion>
  <parent>
    <groupId>org.springframework.boot</groupId>
    <artifactId>spring-boot-starter-parent</artifactId>
    <version>2.6.4</version>
    <relativePath/> <!-- lookup parent from repository -->
  </parent>
  <groupId>com.example</groupId>
  <artifactId>back</artifactId>
  <version>0.0.1-SNAPSHOT</version>
  <name>back</name>
  <description>Example Project</description>
  <properties>
    <java.version>1.8</java.version>
  </properties>
  <dependencies>
    <dependency>
      <groupId>org.springframework.boot</groupId>
      <artifactId>spring-boot-starter-web</artifactId>
    </dependency>

    <dependency>
      <groupId>org.springframework.boot</groupId>
      <artifactId>spring-boot-devtools</artifactId>
      <scope>runtime</scope>
      <optional>true</optional>
    </dependency>
    <dependency>
      <groupId>org.springframework.boot</groupId>
      <artifactId>spring-boot-starter-test</artifactId>
      <scope>test</scope>
    </dependency>
    <dependency>
      <groupId>org.springframework.boot</groupId>
      <artifactId>spring-boot-starter-thymeleaf</artifactId>
    </dependency>
  </dependencies>

  <build>
    <plugins>
      <plugin>
        <groupId>org.springframework.boot</groupId>
        <artifactId>spring-boot-maven-plugin</artifactId>
      </plugin>
    </plugins>
  </build>

</project>
input.html
<html lang="ja" xmlns:th="http://www.thymeleaf.org">

<head>
  <meta charset="UTF-8">
  <title>form</title>
  <script type="text/javascript"></script>
</head>

<body>
  <form th:action="@{/recieve}" method="post">
    <label>
      メッセージ:<input type="text" name="message"><br>
    </label>
    <button>送信</button>
  </form>
</body>

</html>
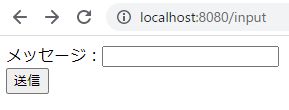
バックエンドの実行結果
以下のように表示されれば準備OKです。
フロントエンドモジュールの作成
Nuxt.jsのインストール&プロジェクト作成
ここでは詳細は割愛します。
バックエンドモジュールとの連携
axiosによるGet結果の表示
index.vueを以下のように変更します。
バックエンドモジュールに対してGetリクエストを投げて、結果を表示します。
<template>
  <span>{{ get_result }}</span>
</template>

<script>
export default {
  name: 'IndexPage',
  async asyncData({ $axios }) {
      const url = "http://localhost:8080/"; // 接続先URL
      const response = await $axios.$get(url); // GET
      return {
        get_result: response
      };
    }
}
</script>
以下のURLがフロントの画面表示となります。
http://localhost:3000/
ただし、このままではセッションにデータが存在しないため、何も表示されません。
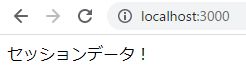
実行結果(フロント⇔バックエンド間のセッションデータ連携)
1.入力フォームで任意の値を入力して、送信ボタンを押します。
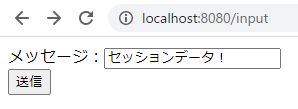
2.画面が切り替わり(フロントにリダイレクト)入力した値が表示されます。
処理の流れ
処理の流れをおさらいすると以下の通りです。
- バックエンド側の入力フォームから入力データを送信。
- バックエンド側で入力データを受け取り、セッションにデータを保存しフロントにリダイレクト。
- フロント画面を開き、バックエンドへGETを実行。
- フロント画面から呼ばれたバックエンド側のGET処理で、セッションからデータを取得し返却。
- フロントで受け取ったデータを表示。
以上、フロント⇔バックエンド間でセッションを用いたデータ連携を行うことが出来ました。